All content (including text, photographs, and design work) is © Shelly Kuck.
My original artwork is for personal inspiration only and may not be copied for publication or contest submission.
Enjoy your Visit!

Slideshow

Showing posts with label Storage Solutions. Show all posts

Wednesday, October 22, 2008

Make it work Wednesday #16

I am revisiting embellishment storage today because being organized and making it work is always a work in progress.

I found that I was reaching for my hardware that was primarily in storage containers in my roll top desk.

Then, I looked at my Prima Storage system and realized that the space could be better utilized. I started by condensing

down my prima collection to colors I actually use and filled the tins with hardware often reached for. The hanging sheet metal

memo board was a purchased from Target a couple years ago and has housed my Prima's since June of '07. It's about 48" tall with the hanger.

The flowers were condensed down to about 1/3 of the board and replaced with embellishments used often.

Here's the before and after:

Prima_Storage_002_by_papermoon04 CIMG6749 CIMG6754

For previous make it work Wednesday's click on the links below.

#1 Ribbon & lots more (Clip it Up!)

#2 Cardstock/Scrap Storage

#3 DP & 12 x 12 Storage

#4 Punches & Wood Mounted Stamps

#5 Unmounted Stamp Storage

#6 Embellishment Storage

#7 Cuttlebug Embossing Folders

#8 Die Cut Storage

#9 Spellbinder Magnet Storage

#10 Ink/ Pads & Reinkers

#11 Sponges

#12 Punch Template Book

#13 Corner Desk Dish Rack

#14 Mini Mister Rack

#15 Alcohol Inks & Embossing Powders

I hope these ideas inspire you to get organized. Remember, Make it Work!

Wednesday, August 27, 2008

Make it work Wednesday #10

I can't believe this is already make it work #10! This week, I am going to share how I store my reinkers. I try to purchase the reinker with the pad so that I have them when needed. They are also handy for watercoloring, dying ribbon and other background techniques. I want to be able to find the color I am looking for quickly. This system will take a little time to incorporate initially, but if you do this as you purchase reinkers it will be a very small investment that will save tons of time searching in the long run. My classic reinkers are sorted by color families and color coded by punching 1/4" circles of coordinating CS for the tops of the bottles. From trial & error, I have learned to adhere them to the concave tops using Crystal Effects or Glassy Accents. Tacky glue will harden and not adhere to the plastic for long. Just apply the Crystal Effects in a small drop directly to the cap, turn the bottle over and place over the punched circle like you are stamping an image. All classic inks are stored in my roll top desk. You can see them in the drawers with the cut outs.

CIMG6456

They are organized by color families and the drawers are labeled inside. (of course) Initially, I tried writing the color on the caps w/ a sharpie, but I still couldn't find the color I wanted quickly.

CIMG6457

Less used reinkers such as Stazon, are stored in shallow drawers of a vintage tool box. It also houses cleaning pads in the top, wheels/handles/cartridges and individual stamps.

CIMG6458

The colors I use the most - (Distress inks & Adirondack Pigments) are stored on the top of my SU! color caddy. I don't label these bottles because I can easily see the color through the bottles or see the labels. You may also notice from the caddy, that I don't use it to store SU! classic pads as designed. Anybody interested in purchasing gently used Classic ink pads??????????? To make the caddy work for the pad I use the most, I placed black dominos at the back of the slots. The domino's are placed the long way for the shorter Distress pads and the short way for Adirondacks, Versafine, Encore Metallics & Stazon pads.

CIMG6459

You have seen the system that works for me. Take a couple minutes to organize and find a solution that works for you. Here are the past MIW Wednesdays:

#1 Ribbon & lots more (Clip it Up!)

#2 Cardstock/Scrap Storage

#3 DP & 12 x 12 Storage

#4 Punches & Wood Mounted Stamps

#5 Unmounted Stamp Storage

#6 Embellishment Storage

#7 Cuttlebug Embossing Folders

#8 Die Cut Storage

#9 Spellbinder Magnet Storage

Have a great Wednesday & remember, Make it Work!

Wednesday, August 20, 2008

Make it work Wednesday #9

Last week I showed you how I store my die cuts in an altered lunch tin and also my Spellbinder/magnet storage.  I am always looking for a better system and I have revamped my growing collection of Nestabilities this week.  I found magnetic 10" x 12" sheets at the Dollar Tree for $1 each, so my magnetic strips got replaced with the full sheets.  The heating duct in my stamp closet is now wallpapered with magnetic sheets from  floor to ceiling.  It sure doesn't look like I have many sets of dies when I lay them out like this, but I have a bunch of sets on order to fill it up.I do label them for easy reference.

CIMG6429

CIMG6436

Because I am showing you the heating duct, I decided to show you my stamp area in the closet.  I prefer to stand and stamp for most applications, so this is one of my 3 work stations where I create.  The closet is 4' x 5' and houses my Herman Miller table that is hydraulic and adjusts from sitting to standing height. Here are photos from left to right.  The lavender drawers hold my acrylic blocks, adhesives, gel pens and anything I grab often.  The very top shelf in the closet holds my Xyron and cartridges and other items I don't use as often.

 SDC11698 SDC11699

The top tier of the file cabinet has a flipper door that holds everything from scissors, label maker (which needs to be handy) misters, and even instant coffee crystals and epsom salt.  The top has embossing powders and alcohol inks in Tim Holtz Cropper Hopper tins as well as SU! punch boxes, alterables and more.  The plastic drawer has 6 x 6 designer paper pads.  Yes, those are jelly belly's in the red apothecary jar.

SDC11702

The wooden holder is a revolving remote control holder from Hobby Lobby.  It is perfect to hold my ATG gun, Stamp Positioner sheets, frequently used hand punches, scissors, hammer, bone folder, tweezers, little ruler, pliers and Stamp a Ma Jig handle.  I need to alter it, but never seem to get to it.

SDC11704 SDC11705

Here are the links for past make it work Wednesday editions.

#1 Ribbon & lots more (Clip it Up!)

#2 Cardstock/Scrap Storage

#3 DP & 12 x 12 Storage

#4 Punches & Wood Mounted Stamps

#5 Unmounted Stamp Storage

#6 Embellishment Storage

#7 Cuttlebug Embossing Folders

#8 Die Cut Storage

I hope you have enjoyed a little peek into my haven and are inspired to find a system that works for you.

Have a great Wednesday and remember, MAKE IT WORK!

Wednesday, August 13, 2008

Make it Work Wednesday #8

Last week, I showed you how I store my embossing folders.  This week is Die Cuts.  I store my file cards in a tin lunch box similar to the altered one for my folders I showed you last week.  Click on #7 below if you want to see the embossing folder box.

FS80 Soar_SaK 002 

SDC11640

Nothing Fancy here, just some black cardstock and slide sized page protectors cut up and eyleted to the CS with the opening's to the outside edges.  Like my embossing folders, all dies are labeled with the name for easy reference.  (oops, I see I missed a label on Fish)

SDC11637 

Same as above, but with 6 per sheet.

SDC11638

My long die sets are in business card sized page protectors.  They just slide in on the left end and stay in place nicely.

SDC11641

larger dies worked out perfectly in a portion of a offset scrapbook page protector that I cut apart.

SDC11639

Sizzlets are in cut up baseball/ATC size page protectors.

SDC11642

I can't take credit for my Spellbinder die storage.  It was on somebody elses blog a while back and I can't remember whose.  One of the walk in closets in my stamp room has a heating duct in it so I just added strips of adhesive backed magnets and put the dies up in sets.  They are labeled so I know the set names.  I have more nesties coming, so the duct is going to get fuller soon.  You have seen how I store my dies, now it's your turn to find a system & make it work for you.

For past Make it work Wednesday editions, follow these links:

#1 Ribbon & lots more (Clip it Up!)

#2 Cardstock/Scrap Storage

#3 DP & 12 x 12 Storage

#4 Punches & Wood Mounted Stamps

#5 Unmounted Stamp Storage

#6 Embellishment Storage

#7 Cuttlebug Embossing Folders

Have a great Wednesday and remember, MAKE IT WORK!

Wednesday, August 06, 2008

Make it work Wednesday #7

My collection of Embossing Folders for Cuttlebug is growing, so today I am showing you my storage solution for them.

CB Folder Tin_SaK

The altered tin is 6 1/4" wide, x 5" tall 4". The book plate is by Basic Grey.

inside CB storage_SaK

I have made index sheets that are embossed with each folder and indexed using the round tab punch. The index sheets are 1/4 sheets of CS. I was making them pretty and attaching the tabs with brads at one point, but I am now just stapeling them to the tops to save time. The cooresponding folder is filed behind each index sheet. The tin holds 24 folders & index sheets and is quite snug now. I am working on tin #2 and will categorize them by style when done.

Index Card & labeling_SaK

I just got the latest embossing borders and wasn't sure how to store them at first. This is working for me right now. I just took a scrap of white CS slightly smaller than 1/4 sheet and slid the folders over the CS. They are held in place with binder clips. I label each folder when making labels for my index tabs for the folders so I can quickly reference the name when uploading details for a project and to file them quickly too.

Borders_SaK

small folders_SaK

My little folders are stored much the same way. I fashioned sleeves by cutting up business card page protectors and securing to CS with eyelets. The outside ends are open to slide the folders in.

You have seen how I store my folders, now it's your turn to find a system to make it work for you. Get organized!

For past Make it work Wednesday editions, follow these links:

#1 Ribbon & lots more (Clip it Up!)

#2 Cardstock/Scrap Storage

#3 DP & 12 x 12 Storage

#4 Punches & Wood Mounted Stamps

#5 Unmounted Stamp Storage

#6 Embellishment Storage

Have a great Wednesday and remember, MAKE IT WORK!

Wednesday, July 30, 2008

Make it work Wednesday #6

Can you believe that this is my 6th Make it work Wednesday already? I wanted to share my hardware/embellishment storage with you this week. I used to have the stack n store containers in the plastic holders that SU! sold. They stand on their own or can be hung on the wall. I now have 8 of them to get rid of. They hold 6 large containers or 12 small ones, but just took up too much room for how much they held.

CIMG6317

So, I took all of my containers and put them in a drawer in my roll top desk. The drawer holds 38 large containers and 20 small. I have them labeled so I can find what I am looking for quickly.

CIMG6312

But not all my embellishments are in these containers. some won't fit and I don't have enough containers. That's where these index boxes from the Dollar spot at Target come in and also some small storage boxes. They work perfectly on my Clip it Up!, you wouldn't believe how much you can hang on this thing!

CIMG6318

I also have 4 metal containers with the small watchmaker tins that contain more stuff.

CIMG6315

Look what arrived on my doorstep this afternoon, fun Tim Holtz hdwe. Gotta get organizing I guess!

CIMG6328

For past Make it work Wednesday editions, follow these links:

#1 Ribbon & lots more (Clip it Up!)

#2 Cardstock/Scrap Storage

#3 DP & 12 x 12 Storage

#4 Punches & Wood Mounted Stamps

#5 Unmounted Stamp Storage

Have a great Wednesday and remember, MAKE IT WORK!

Wednesday, July 23, 2008

Make it work Wednesday #5

For this weeks edition on Make it work Wednesday, I am showing you my unmounted stamp storage. I have many different kinds of um's from clear stamps, those mounted on EZ Mount, naked rubber and sets I have unmounted. I will start with the stamps in CD cases.
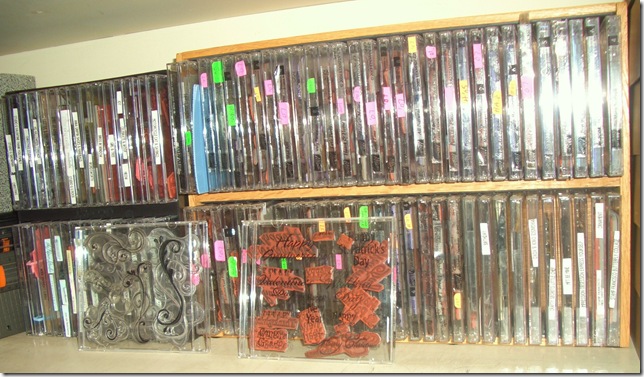
unmounteds

I have unmounted a good share of my SU! stamps by placing the stamps in the microwave and peeling the cushion and rubber off the wood blocks. They are stuck to the inside of the CD cases. I either removed the index labels from the blocks for the outside of the cases or stamped the images using Stazon. The ends are all indexed by set name, manufacturer and theme. The wood rack holds 60 cases and was $1.50 at my favorite resale shop. The one to the left holds 30 and is just a plastic one that I repurposed.
CIMG6285

CIMG6284

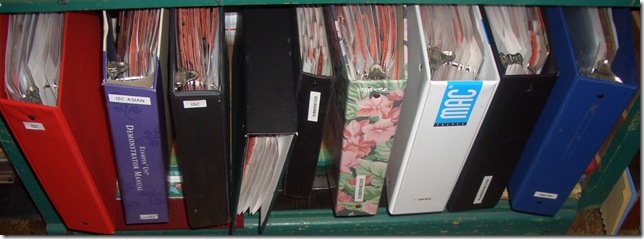
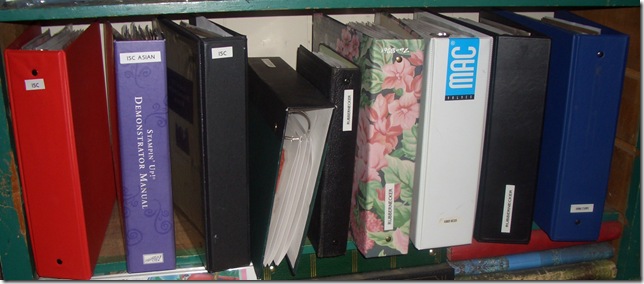
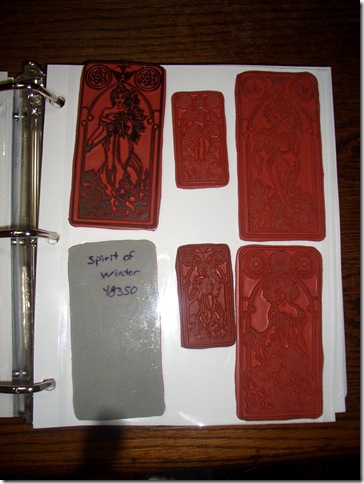
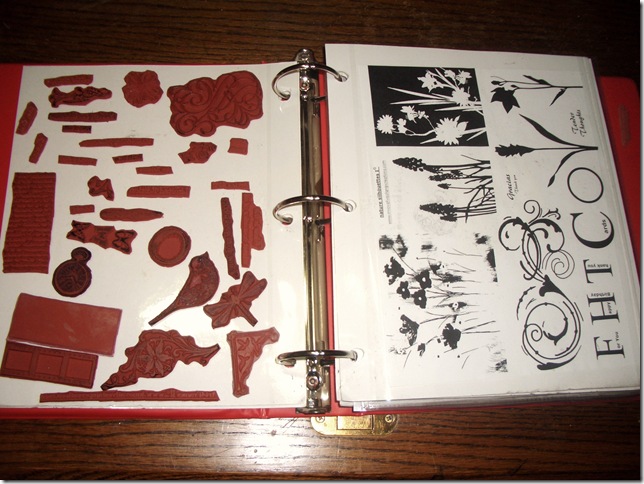
The majority of my stamps are housed in binders as shown here. 5 Binders contain Rubbernecker stamps that come mounted on EZ mount smart cling foam. They cling to photo refill pages nicely. Here is a shot of one of the pages with a stamp flipped over. I also use a sharpie to index the back so I have the information handy when I upload details for a project.
CIMG6277

stamp sheets with wacky tac

Innovative Stamp Creations rubber comes as full sheets of uncut rubber. Because of the expense of purchasing a ton of EZ mount, I have not added cushion to them. They are closely trimmed and a thin coat of Wacky Tac is applied to the backs. They rubber is also stored on photo refill pages with the index sheet on the front and the images on the flip side. I also use page protectors with a thin piece of cardboard behind the index sheet. Both systems work very nicely. You can purchase Wacky Tac on the web, just google it. It is like repositionable sticky note adhesive.
CIMG6281

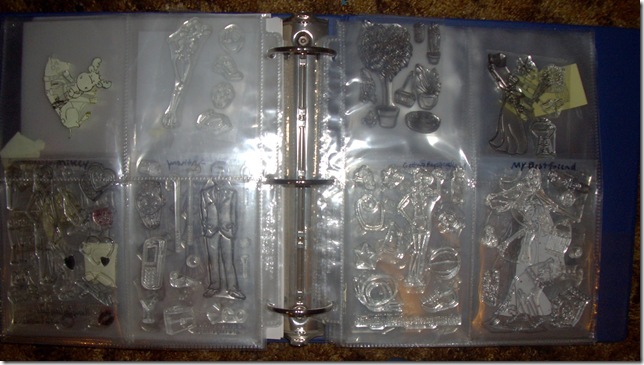
My Hanna stamps are also in a 3 ring binder, but I used page protectors that are divided into 4ths. I just keep the stamp sets on the clear sheets they come on and slip them in the sleeves. I also keep any masks I make and slide them in the pockets as well. My Riley & Sophie stamps are red rubber mounted on EZ mount and are in the front of the binder on photo refill sheets.
CIMG6282

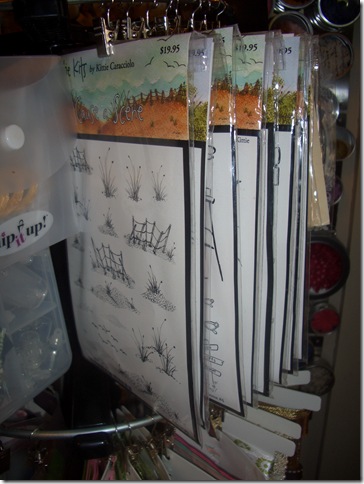
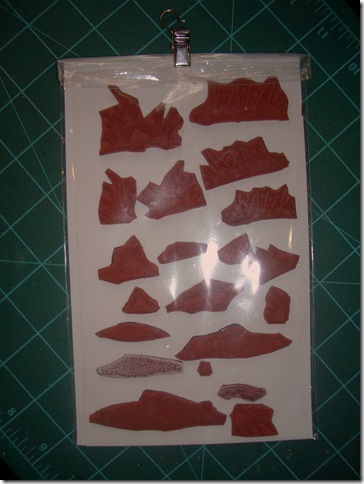
Last, but not least are my Kittie Kits. They come in zip baggies with the index sheet and come as a sheet of rubber with thin cling mount on the back. After trimming them, they all fell to the bottom of the bags. My solution was to cut a piece of glossy white cardstock to slip in the bags. The stamps are all nice and orderly and hanging on my Clip it up! now.
kittie kits on glossy

This system has saved me a ton of room and I can find the stamps I am looking for very quickly. I hope this inspires you to find a system that works for you.

For past Make it work Wednesday editions, follow these links:

#1 Ribbon & lots more (Clip it Up!)

#2 Cardstock/Scrap Storage

#3 DP & 12 x 12 Storage

#4 Punches & Wood Mounted Stamps

Have a great Wednesday and remember, MAKE IT WORK!

Wednesday, July 16, 2008

Make it work Wednesday #4

I decided to share my punch storage with you today (the majority of them anyway) as also the way I store my mounted stamps. First for the punches. I purchased the lucite wall organizer from Staples or Office Max years ago to store the old style SU! pads in it so it got repurposed. The wooden rack on the top right was purchased at a resale shop for $1.50 and is a magazine rack for the wall. I just removed the middle bar so I could store 8 large punches and a few little ones along the bottom. The wooden rack on the left is an inexpensive storage crate from Hobby Lobby that has a few of the slats removed.
I love having my punches where I can see them and grab what I need easily.


Now for my wood mounted stamps, I have 2 VHS storage units. They hold the clear stamp boxes that measure 6" x 9". The first photo shows the tower & holds 25 boxes with my background stamps on the top. It measures 39" tall and 9" wide.


VHS Tower


I just found the spinner rack at Goodwill yesterday for $2. I holds 24 boxes, 12 on each side. It measures 18" tall and is only 13" wide with the boxes in it. I need to get out my other favorite organization tool - my label maker and index the ends of the boxes so I can find things easier.


CIMG6232 CIMG6231


Next week Wednesday I will share my unmounted storage system with you. If you missed the other Make it work Wednesday posts, you can find them by clicking on the links below.


#1 Ribbon & lots more (Clip it Up!)

#2 Cardstock/Scrap Storage

#3 DP & 12 x 12 Storage