All content (including text, photographs, and design work) is © Shelly Kuck.
My original artwork is for personal inspiration only and may not be copied for publication or contest submission.
Enjoy your Visit!

Slideshow

Thursday, July 31, 2008

Luau Hanna

Join us over in the Hanna forum at Splitcoast for the release party going on tonight.  Lot's of fun chatter and give a way's!

HSC ReleaseChallengeluau_SaK 

I did Frances challenge with an embossed layer with floral fantasy.  My DP is Paper Studio and then I added ribbon, primas & brad. 


WT177 Scrap It

Today's challenge on Splitcoast is to use scraps on our project. Everything used on today's card were items scrapped from another project that took a different direction. The Pirate Hanna set will be released tonight after the party over in the Member Forums for Hanna Stamps. Stop by and say hello, stay a while or for a couple hours and participate in a couple fun challenges to win 1 of the 4 new sets to be released!

The image was colored with Copic markers and sponged with Distress old paper and antique linen inks. The background is a jumbo wheel called Mateys Map by SU! I wheeled in Frayed Burlap on the red layer and Antique Linen on the folded card base. Edges were heavily distressed and dirtied using a toothbrush and Versafine Vintage Sepia.

Wednesday, July 30, 2008

Make it work Wednesday #6

Can you believe that this is my 6th Make it work Wednesday already? I wanted to share my hardware/embellishment storage with you this week. I used to have the stack n store containers in the plastic holders that SU! sold. They stand on their own or can be hung on the wall. I now have 8 of them to get rid of. They hold 6 large containers or 12 small ones, but just took up too much room for how much they held.

CIMG6317

So, I took all of my containers and put them in a drawer in my roll top desk. The drawer holds 38 large containers and 20 small. I have them labeled so I can find what I am looking for quickly.

CIMG6312

But not all my embellishments are in these containers. some won't fit and I don't have enough containers. That's where these index boxes from the Dollar spot at Target come in and also some small storage boxes. They work perfectly on my Clip it Up!, you wouldn't believe how much you can hang on this thing!

CIMG6318

I also have 4 metal containers with the small watchmaker tins that contain more stuff.

CIMG6315

Look what arrived on my doorstep this afternoon, fun Tim Holtz hdwe. Gotta get organizing I guess!

CIMG6328

For past Make it work Wednesday editions, follow these links:

#1 Ribbon & lots more (Clip it Up!)

#2 Cardstock/Scrap Storage

#3 DP & 12 x 12 Storage

#4 Punches & Wood Mounted Stamps

#5 Unmounted Stamp Storage

Have a great Wednesday and remember, MAKE IT WORK!

Tuesday, July 29, 2008

Time Healer

This is for the sketch over at CPS today that is sponsored by Rubbernecker Stamp Co.  I chose to use a couple stamps I recently got and haven't used.  The clock background and time dreamer are new to me.  I used glossy cardstock and Adirondack alcohol inks to create my layers and stamped the images in Stazon Jet Black.  Alcohol ink colors are: Red Pepper, Slate, Espresso, Latte, Butterscotch and Gold. I ended up embossing the sentiment so it showed up better.  The clock faces are by 7gypsies I believe and the ribbon is May Arts.  Isn't the ric rac yummy?  Wish you could see the distressed look of it in person.  CPS75 Time Healer_SaK

Be sure to check back tomorrow for another Hanna sneak peek and of course Make it work Wednesday!

Treasure Hunt Tuesday

Arrrrr ye mateys! It’s Tuesday and that means thar’s a Treasure Hunt a happenin’. Shiver me timbers – you heard me right. It’s Treasure Hunt Tuesday at Rubbernecker! To find yer first clue on the treasure map (and all the other deets), ya must travel to the Rubbernecker Home Page and from there follow the clue! On yer way, please stop by me mates, Kittie, Broni, Candy, Sherry and Tami, for a visit and see what they’ve been up to. Ya never knows what prizes or treasure you will find along yer way!

Blog candy is being offered by Sherry & Linda today. So, be sure to stop by and visit them for a chance to win.

RBC20_Witching you_SaK

I was in a fall mood yesterday and made this cute tent card using Rubbernecker images. The witch was colored with copic markers and misted with a water and gold perfect pearls mixture. It really is layered on lilac cardstock, it just looks quite blue in the photo. The black cardstock was dry pressure embossed with the Diamonds in the rough folder.

HSC27 Harvest_SaK

Here's a sneak peek of a new mini set available from Hanna Stamps on Friday August 1st. The set is called Trick or Treat. I have only used the scarecrow for my card from the set. The sentiment is available from Rubbernecker Stamp Co.
The scarecrow was colored with Copics and then sponged with distress inks. I finished it by putting a piece of magic mesh on an acrylic block and inking it with distress Old Paper ink and then stamping over the entire layer.

Monday, July 28, 2008

School Days

Happy Monday, today starts a week of sneak peeks of new sets from Hanna Stamps that will be available on Friday August 1st. Can you believe it is almost August? I know I am ready for the kids to go back to school. They are getting bored I think.... So, to start out I have used a set called Teacher. Lots of fun stamps in the set and there is a Hanna Teacher that is just too cute. You will see her another day. There is also a Pirate set, Halloween and Luau set.

HSDT Teacher_SaK

Sunday, July 27, 2008

Flowered Inspiration

Today's Featured Stamper is Julia who I have admired for a very long time.  It didn't take me long to decide on a card in her vast gallery because it was one she did for an inspiration challenge that I loved.  You can see her card HERE.  Changes include different stamps, ribbon sentiment die cut and my butterfly is on vellum and positioned differently.  I also used my Scor-Pal for the lines around my image because I didn't have the right size die for the image I used.  The images are from Innovative Stamp Creations Summer Elements III and About Me! sheets.  I used a spellbinders double ended tags die cut for the sentiment and highlighted the vellum butterfly with a Sakura Stardust gel pen.  The black strip is crimped but my not show in the photo.

FS77 Juliainspired_SaK

Saturday, July 26, 2008

Hello Spider

So, this morning the boys and I are at Lowes and we run into a stamping friend.  She points out that I haven't posted to my Blog since Wednesday.  OK, here you go lori!  Our awesome mail carrier Kevin delivered a huge box of Halloween & Thanksgiving stamps from Rubbernecker.  So, after getting them all indexed and in binders I stamped a card.  More to come, so many fun new images! 

Hello Spider_SaK

I used Grand Spider Web and Mr. Spider for my card today.  The tag was die cut from spellbinders double ended tags set.  Green Cardstock is Prism intense kiwi.  I also used green ribbon and black gingham ribbon as well as my dymo labeler for the sentiment. 

Wednesday, July 23, 2008

Make it work Wednesday #5

For this weeks edition on Make it work Wednesday, I am showing you my unmounted stamp storage. I have many different kinds of um's from clear stamps, those mounted on EZ Mount, naked rubber and sets I have unmounted. I will start with the stamps in CD cases.

unmounteds

I have unmounted a good share of my SU! stamps by placing the stamps in the microwave and peeling the cushion and rubber off the wood blocks. They are stuck to the inside of the CD cases. I either removed the index labels from the blocks for the outside of the cases or stamped the images using Stazon. The ends are all indexed by set name, manufacturer and theme. The wood rack holds 60 cases and was $1.50 at my favorite resale shop. The one to the left holds 30 and is just a plastic one that I repurposed.

CIMG6285

CIMG6284

The majority of my stamps are housed in binders as shown here. 5 Binders contain Rubbernecker stamps that come mounted on EZ mount smart cling foam. They cling to photo refill pages nicely. Here is a shot of one of the pages with a stamp flipped over. I also use a sharpie to index the back so I have the information handy when I upload details for a project.

CIMG6277

stamp sheets with wacky tac

Innovative Stamp Creations rubber comes as full sheets of uncut rubber. Because of the expense of purchasing a ton of EZ mount, I have not added cushion to them. They are closely trimmed and a thin coat of Wacky Tac is applied to the backs. They rubber is also stored on photo refill pages with the index sheet on the front and the images on the flip side. I also use page protectors with a thin piece of cardboard behind the index sheet. Both systems work very nicely. You can purchase Wacky Tac on the web, just google it. It is like repositionable sticky note adhesive.

CIMG6281

My Hanna stamps are also in a 3 ring binder, but I used page protectors that are divided into 4ths. I just keep the stamp sets on the clear sheets they come on and slip them in the sleeves. I also keep any masks I make and slide them in the pockets as well. My Riley & Sophie stamps are red rubber mounted on EZ mount and are in the front of the binder on photo refill sheets.

CIMG6282

Last, but not least are my Kittie Kits. They come in zip baggies with the index sheet and come as a sheet of rubber with thin cling mount on the back. After trimming them, they all fell to the bottom of the bags. My solution was to cut a piece of glossy white cardstock to slip in the bags. The stamps are all nice and orderly and hanging on my Clip it up! now.

kittie kits on glossy

This system has saved me a ton of room and I can find the stamps I am looking for very quickly. I hope this inspires you to find a system that works for you.

For past Make it work Wednesday editions, follow these links:

#1 Ribbon & lots more (Clip it Up!)

#2 Cardstock/Scrap Storage

#3 DP & 12 x 12 Storage

#4 Punches & Wood Mounted Stamps

Have a great Wednesday and remember, MAKE IT WORK!

Tuesday, July 22, 2008

RBC19 SCENE

Shiver me timbers, it’s Treasure Hunt Tuesday at Rubbernecker Stamp Company! Grab yer duffle and join us abaft as we set sail to plunder all the treasure that be waitin’ fer ya. As we set sail, there are a few ports we’ll be stoppin’ at. Both Kittie and Broni have some extra bounty today and ye need to stop at Jeanne’s to find out about the Rubbernecker Blogger Challenge today. After ye stops there, head on over to Rubbernecker where ye will find the first clue in the Treasure Hunt and more deets on how ya may claim ye bounty! While ye are sailing around today, make sure ye stop and visit the rest of me mates, Tami, Leigh, Candy, Linda, and Sherry  who have samples posted today.

Today’s Rubbernecker Blogger Challenge (RBC19) is to create a scene.  I used the new Kittie Kits, Master #2 & Scenes #4 & 5 for my card today.  Inks are Versafine Onyx black, Smokey Gray & Vintage Sepia.  Distress Shabby Shutters & antique Linen.  I added some Adirondack snow cap pigment ink to the cloudsThe sky was sponged  with classic ink Soft Sky.  The scene was  finished with a mist of water and perfect pearls gold. 


RBC19 by the shore_SaK

Friday, July 18, 2008

HSC26 Merry Moosemas!

Frances is hosting this weeks Hanna Challenge over in the Splitcoast Forum.  With 100% humidity and temps in the 90's, it was hard for me to think Christmas in July, but who can resist stamping with these cute Rileys?

HSC26 Merry Moosemas!_SaK

DP's are Basic Grey Figgy Pudding, Velvet Ric Rac is May Arts.  My circles were cut with a coluzzle and the olive ring was dry brushed with an old toothbrush loaded with Versafine Vintage Sepia ink.  I raised the circles on foam dimensional tape. The nice thing about clear stamps is that you can stick them on the acrylic block in a curve to fit the area you are stamping.  I cut the sentiment in 2 to do this.  The image is colored with Copic Markers and I added crystal stickles and fun flock to the hat and beard.

Merry Moosemas in July!

Thursday, July 17, 2008

Acrylic Resist Tutorial

As promised, here's the April tutorial that I tried from Tim Holtz's blog.

Art Unlocked_SaK 001

You will need: Craft Sheet, Designer paper, Acrylic Paint, (burnt umber used here) Shipping Tags, Clear Embossing Powder, Versamark pad, Stazon Black & White, Distress ink/Tea Dye, Adirondack Pitch Black, Craft Iron, pastel chalks, Walnut Ink, Acetate, assorted embellishments.

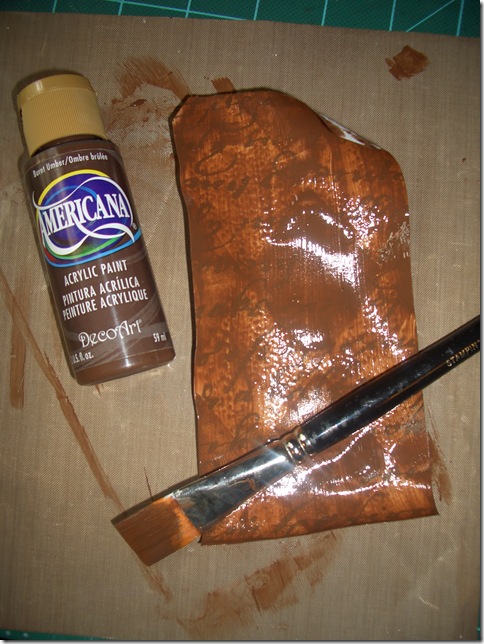
Start by cutting the DP the size of your largest shipping tag and stamp a large solid pattern using Versamark ink. Emboss with clear powder. Cover paper with acrylic paint and let dry.

CIMG6245

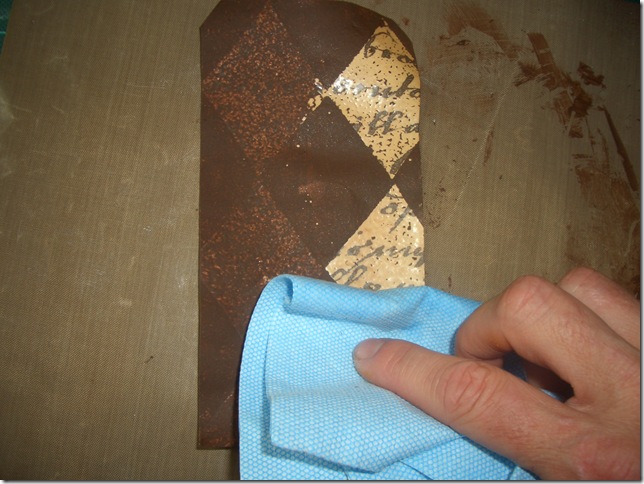
Using a damp rag, wipe the paint off the embossed images to reveal the DP.

CIMG6246

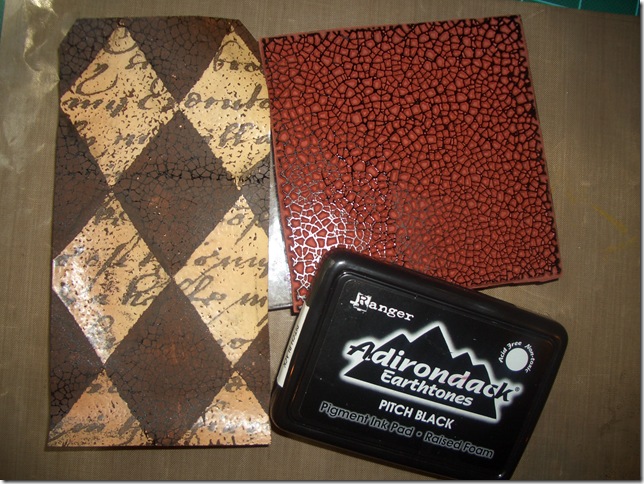
Stamp the crackle pattern over the entire layer and carefully wipe off the embossed areas.

CIMG6247

Stamp desired images on the small shipping tag using Stazon ink.

CIMG6248

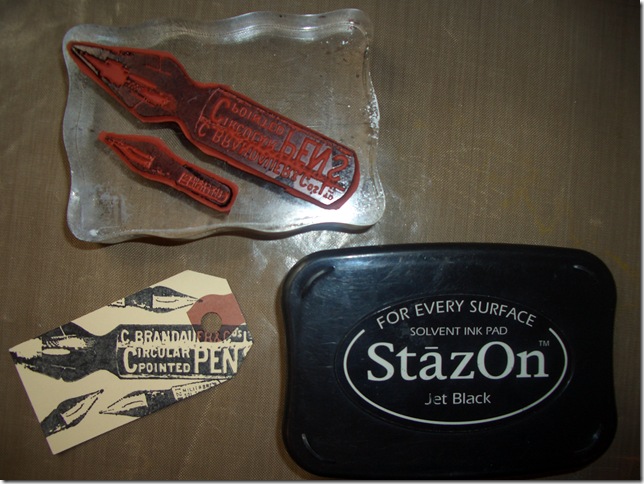
Saturate using Walnut ink.

CIMG6249

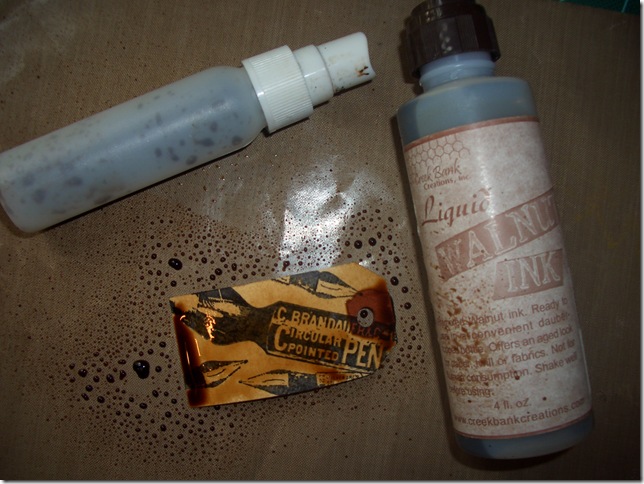
Crumple the tag up while still wet and smooth back out lightly.

CIMG6252

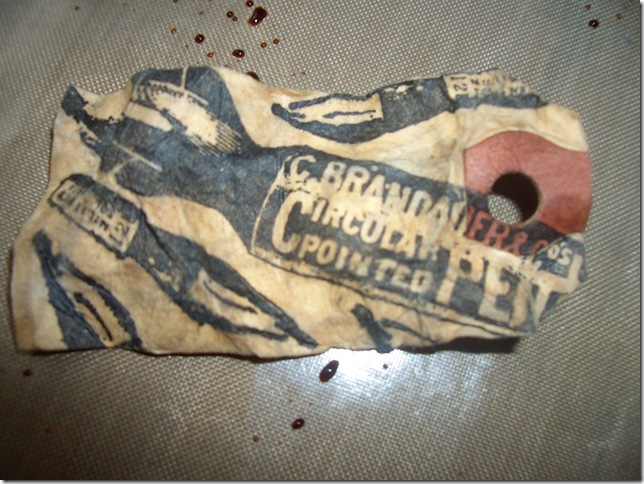
Swipe the stamp pad across the crumpled tag to accent the peaks, then iron to flatten it and dry the tag.

CIMG6253

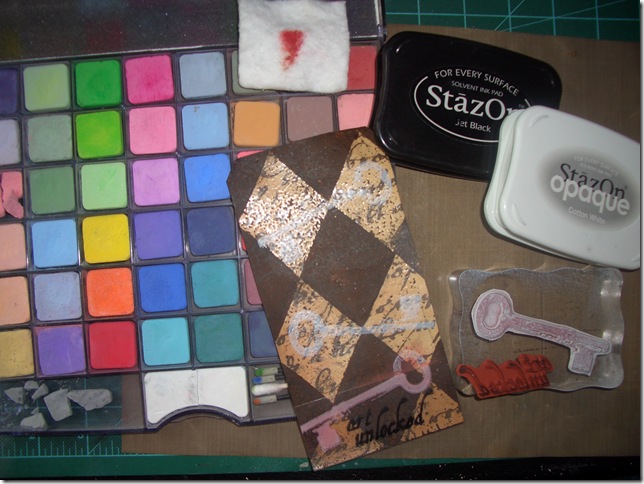
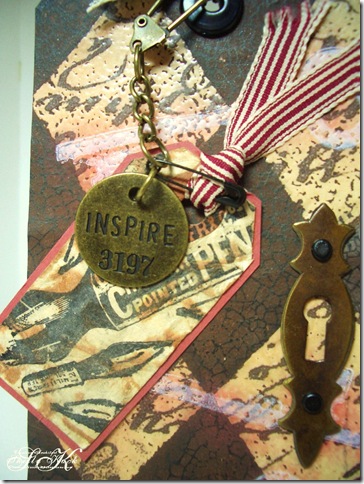
Stamp the keys and sentiment using Stazon inks and highlight the keys with chalks.

(I stamped the sentiment on a strip of acetate so it did not blend into the layer) The bottom key

is partially on the acetate and partially on the layer.

CIMG6255

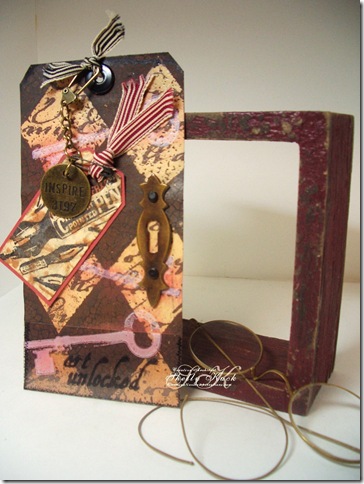
Affix the stamped DP to the largest shipping tag, add a jumbo eyelet, Small tag, ribbons and hardware.

The key hole is vintage hardware from a recent antiquing trip. (I got 8 for $6)

I hope you enjoyed this tutorial and have found it helpful, have a great stamping day!

P.S. Beate asked me to do a tutorial on collage stamping for the Weekly Inkling over at Splitcoast, if you are interested it can be viewed HERE

Art Unlocked_SaK 002

ISCC8 Tim Technique

ISCC8Discovery_SaK 001

The challenge over at Innovative Stamp Creations today is to use ISC stamps and a technique from Tim Holtz's blog.

Play along and upload your creations to your blog and/or on line gallery for a chance to
WIN a FREE ISC Stamp Sheet of your choice! Super easy, use ISC stamps only on your design, then post your link in the comments section! A random name will be chosen and announced on the blog. You have until Sunday July 27, 2008 to create/post your link on the ISC blog. Search for label ISCC8. We can't wait to see what you come up with!

Tim Holtz March Technique Challenge

ISCC8Discovery_SaK 002

Tim does such an amazing job with Ranger inks, I had so much fun trying his techniques. For my first tag, I stamped the moon using acrylic paint first. Let it dry and then heavily mist with a combination of Distress reinker/perfect pearls/water. I used 3 different combinations here. Fired Brick/Copper, Dried Marigold/Gold & Walnut Stain/Perfect Bronze. Use a heat tool to "move" the colors around a bit and dry the tag. After dry, stamp main images using Adirondack Black Pitch pigment ink and embellish.

Here's a sneak peek of Tim's April Technique. My tutorial is here.Art Unlocked_SaK 002