All content (including text, photographs, and design work) is © Shelly Kuck.
My original artwork is for personal inspiration only and may not be copied for publication or contest submission.
Enjoy your Visit!

Slideshow

Showing posts with label Tutorial. Show all posts

Wednesday, March 11, 2009

ATC Swing Card

Today's Wacky Wednesday Challenge #2 over at the Rubbernecker Blog is to create a card using a different fold. 

Be sure to check out what the design team has come up with and get inspired to create your own.  You could win one of three 25% off certificates!

Bev - Savor the Journey 

Broni - Splashes of Watercolor

Candy - Candys Land

Joan - Stamping with a Passion!

Jules - Stampin with Inky Fingers

Kittie - Kittie Kraft

Linda - Linda’s Works of Heart

Tami - A Walk on the Mild Side

Sherry - Walkin' on the BAD Side!

In order to qualify for one of the three certificates for 25% off your entire order at Rubbernecker, you must post a link to your project by Monday March 16

on the Rubbernecker Blog.  Winners will be announced on Tuesday, March 17. Have fun creating!

I thought about what I would do this week and remembered a fun fold I haven't done for quite a while.  The ATC's were so fun last week that I decided to

adapt the standard A2 cutting directions to ATC size.  This is a fun interactive enclosure card. (cutting directions follow if you want to create your own)  On to the ATC:

WW#2SwingATC_SaK 001 WW#2SwingATC_SaK 002

The finished size, true to ATC's is 2 1/2" X 3 1/2"  The card was inspired because I needed a special enclosure card to accompany food for some dear friends who just lost a loved one.  Anyway, all stamps are available from Rubernecker Stamp Co.  The background is Baroque BG stamped in VersaMagic Wheat, the lady is from Herbal Collage BG and the sentiment is from the Petite Words collection in the Stamp Oasis section.  Cardstock is Black, Ivory and Gray.  The Edges of the ATC were outlined using an American Crafts Galaxy Marker.  I used Spellbinders Classic Scalloped Rectangles, lg & sm. for the swing layers.  The decorative brad is by Making Memories and is attached to the ATC base.  I used SU! slit punch to first make the punch, then punched a 1/8" circle punch in the center.  Added the brad and tucked the flip part of the card under it to keep it closed. 

Cutting and scoring directions are specific to using a 12" personal cutter with cutting and scoring blades. 

You will start with a piece of Cardstock cut to 3 1/2" x 4" 

CIMG7034 Place in cutter with the scoring blade on the slide rule. 

The 4" side of the CS should be squared at the top of the cutter and the left edge at the

1 1/2" mark.  SCORE from the top down to the 5/8" mark and then from the 2 7/8" mark to the bottom.

  CIMG7036                                                   CIMG7037                                                                                                                                                                                             

Slide CS over to the 2 1/4" mark and repeat the scoring 5/8" from the top and from 2 7/8" to the bottom.

CIMG7038 

Place the cutting blade on cutter. With the edge of the cardstock at the 2 7/8" mark and the 4" edge still at the top of the cutter, 

cut from the 5/8" mark to the 2 7/8" mark.

 CIMG7040

Flip CS over, line up left edge at the 3 1/8" mark and repeat cut from the 5/8" mark to the 2 7/8" mark.

CIMG7041

Flip CS back over and turn CS 1/4 turn clockwise so the 3 1/2" edge is at the top and cut from the horizontal cut line to the score line,

move down and cut from the score line to the cut line. (do not cut between the score lines)

CIMG7050

Flip CS over and repeat the cuts from cut line to score line/score line to cut line.

CIMG7043CIMG7044

You will now have a rectangle Cut with a 3/4" gap at the top and bottom of the rectangle. 

(note that the rectangle is NOT centered, but offset 1/4" to the left side.  This is so the rectangle will be positioned properly when the swing card is folded/closed) 

Mountain fold at the left score lines and valley fold the right fold lines.  The swing rectangle is 2" x 2 1/4", Finished ATC size is 2 1/2" x 3 1/2"

Now you are ready to decorate your swing card.  Have fun!

Wednesday, October 22, 2008

Acrylic Resist Tutorial

I had the pleasure of doing another Tutorial for Splitcoast Stampers this week. I won't go into all the nitty gritties,

check out the full tutorial HERE

Acrylic Resist love Tutorial

Monday, September 22, 2008

Distress Acrylic Resist Tutorial

I am back from Chicago and totally beat. Working with Bad Sherry and Meg/Waxyo was a pleasure. Mr. Rubbernecker/Dave is always a delight to be with and Mrs. Rubbernecker/Pat is as well. I got back to Michigan with the Rubbernecker's at about 1 AM this morning. Is it naptime yet? I wanted to create a tutorial of the demo I did at the Rubberstamp Expo before going up for a nap, so here it is. I would call the technique Distress Acrylic Resist. The first sample was created using 2 colors of distress inks, 1 color in an Adirondack Paint Dabber and Stazon Black. Ready?

DemoAcrylic Distress Resist_SaK 011

Here are the supplies you will need:

DemoAcrylic Distress Resist_SaK 003

Using the applicator handle and an Ink Blending Foam pad, work Dried Marigold ink into a shipping tag.

DemoAcrylic Distress Resist_SaK 004

Stamp a bold image in a darker color ink over the inked tag in Aged Mahogany.

DemoAcrylic Distress Resist_SaK 005

Ink a bolder background image that has some open areas with versamark and emboss with clear EP.

DemoAcrylic Distress Resist_SaK 006

Sorry about the blurry photo. Cover the entire tag with a thick coating of Adirondack Espresso acrylic paint.

DemoAcrylic Distress Resist_SaK 007

Wipe off acrylic paint with a soft towel or cloth.

DemoAcrylic Distress Resist_SaK 008

Using the same blending foam inked with dried marigold to "buff" the tag. I have done the top 2/3

of the tag to show you the difference this step makes. The flowers really "pop" with this step.

DemoAcrylic Distress Resist_SaK 009

Stamp some words or other images in black using a solvent based ink on the tag.

Using a new Blending Foam Pad, ink the edges of the tag w/ Stazon Jet Black to frame the tag in.

DemoAcrylic Distress Resist_SaK 010

All images and supplies available from Rubbernecker Stamp Co.

Stamps include: KK Originals Floral Set, Stamp Oasis Nouveau Background & Hear Music Text

Inks: Distress Dried Marigold & Aged Mahogany. Versafine, Stazon Jet Black

Shipping Tag

Accessories: Clear EP, Blending Foam, Applicator Tool, Heat Gun, Craft Mat, Tim Holtz Accessories,

Assorted Ribbons and Fibers

DemoAcrylic Distress Resist_SaK 002

The Blue tag uses the same technique and supplies, but I only used one color of distress ink/Faded Jeans for the sponging on the tag,

Stazon black for the flowers and Adirondack Mushroom paint dabber over the clear embossing. OK, it's naptime!

Tuesday, August 05, 2008

Arrrr......... Is it Tuesday Already?

It is Tuesday and that means thar’s a Treasure Hunt a happenin’. Shiver me timbers – you heard me right. It’s Treasure Hunt Tuesday at Rubbernecker!

Before I get to the treasure, I have a couple treasures to share with you. The Rubbernecker Design Team is pleased to announce the latest Mateys as Guest Designers.

Bev Gerard AKA TexasGrammy on Splitcoast and

Juliana Swanson/Jules AKA Julesiana on Splitcoast. Be sure to sail on by and welcome them!

To find yer first clue on the treasure map (and all the other deets), ya must travel to the Rubbernecker Home Page and from there follow the clue! On yer way, please stop by me mates, Kittie, Broni, Candy, Sherry, Linda, Bev, Jules and Tami, for a visit and see what they’ve been up to. Ya never knows what prizes or treasure you will find along yer way!

I am offering Blog candy today. Be sure to comment on this post and tell me your favorite stamping technique for a chance to win $10 to go shopping at Rubbernecker. Be sure to head on over to see Tami as she has blog candy to give away too!

Ready for my card today? I used the CPS76 Sketch for my start and Rubbernecker images and inks. Stop on by Card Positioning Systems and play along.

CPS76 Grateful Bird Call_SaK (2)

I was excited that some of my pre-ordered embossing folders finally found my mailbox today. I chose to use bird call and a negative cuttlebug technique by inking up the back negative portion and then pressure embossing. The full tutorial is on Splitcoast, so I am going to show you some of the other steps I took.

SDC10194

Start by tearing a sheet of 4 1/4" x 5 1/2" computer paper into 3 sections.

SDC10195

Keep the middle section and lightly adhere the ends to a piece of cream CS cut to 4" x 5 1/4".

Step3

Ink Baroque Background (Stamp Oasis section) with Tea Dye Distress ink and stamp over the layers.

SDC10197

Remove the mask from the left side leaving the right side in place, add the center portion and stamp

the script (How do I love thee (Rubbernecker) to cover the exposed CS.

Step 5

Open the embossing folder up and using a rubber brayer, ink up the negative portion (inside back) using

Weathered Wood Distress ink. Use a tissue to remove any ink from unwanted areas. Sandwhich and emboss

as usual.

SDC10200

Sponge edges with Tea Dye and the image with Weathered Wood to soften.

Embellish and assemble on your card base as desired. I chose a wonderful remnant of

vintage lace for my border, wove Silk Anna Griffin ribbon through it and added linen

cross stitching in a couple places. The fabulous sentiment stamp is also from

Rubbernecker Stamp Co. in the Stamp Oasis Section and was stamped in Walnut Stain

distress ink.

While treasure hunting on the Rubbernecker site, be sure to check out the

SALE

*** NEW***Ranger Adirondack Pigment Pads & Reinkers on Sale***NEW***

Sales end Wednesday August 6th

http://www.rubbernecker.com/p-1570-adirondack-pigment-ink-pads.aspx

http://www.rubbernecker.com/p-1571-adirondack-pigment-ink-reinkers.aspx

Thursday, July 17, 2008

Acrylic Resist Tutorial

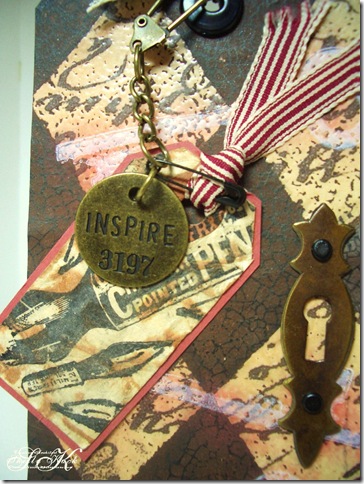
As promised, here's the April tutorial that I tried from Tim Holtz's blog.

Art Unlocked_SaK 001

You will need: Craft Sheet, Designer paper, Acrylic Paint, (burnt umber used here) Shipping Tags, Clear Embossing Powder, Versamark pad, Stazon Black & White, Distress ink/Tea Dye, Adirondack Pitch Black, Craft Iron, pastel chalks, Walnut Ink, Acetate, assorted embellishments.

Start by cutting the DP the size of your largest shipping tag and stamp a large solid pattern using Versamark ink. Emboss with clear powder. Cover paper with acrylic paint and let dry.

CIMG6245

Using a damp rag, wipe the paint off the embossed images to reveal the DP.

CIMG6246

Stamp the crackle pattern over the entire layer and carefully wipe off the embossed areas.

CIMG6247

Stamp desired images on the small shipping tag using Stazon ink.

CIMG6248

Saturate using Walnut ink.

CIMG6249

Crumple the tag up while still wet and smooth back out lightly.

CIMG6252

Swipe the stamp pad across the crumpled tag to accent the peaks, then iron to flatten it and dry the tag.

CIMG6253

Stamp the keys and sentiment using Stazon inks and highlight the keys with chalks.

(I stamped the sentiment on a strip of acetate so it did not blend into the layer) The bottom key

is partially on the acetate and partially on the layer.

CIMG6255

Affix the stamped DP to the largest shipping tag, add a jumbo eyelet, Small tag, ribbons and hardware.

The key hole is vintage hardware from a recent antiquing trip. (I got 8 for $6)

I hope you enjoyed this tutorial and have found it helpful, have a great stamping day!

P.S. Beate asked me to do a tutorial on collage stamping for the Weekly Inkling over at Splitcoast, if you are interested it can be viewed HERE

Art Unlocked_SaK 002

Tuesday, July 08, 2008

Batik Inspiration

I wasn't gonna do today's color challenge, the colors were truly a challenge for me. But then, something happened and a thought came. (why does that only happen when you aren't thinking?) So, I got out a few simple supplies and dug in.

CIMG6190

Cut 2 2 1/2" squares of Barely Banana CS and stamp with the Batik Flower BG & Adirondack pigment ink/lemonade.

Sprinkle with lightly with Vintage Photo Distress EP. Repeat steps with Groovy Guava CS/Peach Bellini ink. Return

EP to container. Then, dump Antique Linen EP on the Banana squares and return extra to the container, repeat on

the Guava squares using Tattered Rose EP.

CIMG6191

CIMG6192

Scrape edges of heat embossed squares using an old toothbrush.

CIMG6193

Cut Vanilla CS to 5" x 10", score at 2 1/2" & 7 1/2". Fold ends in to meet in the center.

CC174Batikmangobananachips_saK

Affix the embossed squares to the folded card. Punch 1/8" holes on the inner corner of each square.

Cut 2 lengths of ribbon (Martha Stewart) to 16" each. Thread guava ribbon down through the bottom

right guava sq. and up through the top guava sq. Repeat with the banana ribbon on the banana layers.

even out tails and tie a loose bow. Attach a metal frame embellishment to the left squares only using

glue dots and pull ribbon bow through the center. Stamp sentiment using Stazon Timber Brown in the

upper right square.

CIMG6194

Here are the supplies I used, but I forgot to put the Versafine in there, Oh well!

Stamps are by Innovative Stamp Creations Batik Flower sheet.

Have a great day!