All content (including text, photographs, and design work) is © Shelly Kuck.
My original artwork is for personal inspiration only and may not be copied for publication or contest submission.
Enjoy your Visit!

Slideshow

Showing posts with label Wall Art. Show all posts

Wednesday, July 22, 2009

Wacky Wednesday #21

Kittie is the hostess of the challenge today and it is to use a circle or circles on your project. It can  be anything from a simple circle tag to multiple circle frames.  You can make your card as simple or as intricate as you wish.   I don’t have a challenge card today for a couple reasons.  My plan was to get up early and stamp.  I overslept!  I must have slept like a log because I remember my husband shaking me awake in the night and saying that I was snoring loud enough to wake the neighbors.  Huh???????????  I was not even in a deep sleep – so I thought………….  On top of that, I have to make a dish to pass for parents night at Boy Scout camp tonight and work today.  So, that means that my challenge card is not happening.  I do have a photo of my framed challenge project from a few weeks ago though.  This is the first time I have had my work custom framed.  I have tried numerous times to capture the framed work in a photo, and this is as good as it gets.  Anyway, it is truly a Wacky Wednesday for me.  I hope yours goes better and that you can play along in the circle challenge.

P6300009_thumb[21]

Here’s the project I did a few weeks ago.  The details can be found HERE.
P7190001

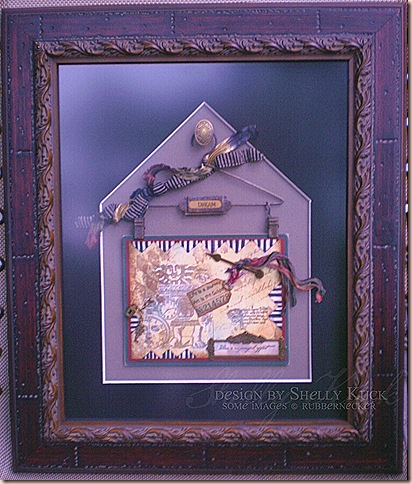
And, it framed.  The finished size is about

14” x 16”  The mat is black linen and the glass is non glare which gave me all kinds of photography issues.  The custom framing was done at Hobby Lobby by a very talented Jackie, who also happens to be a fabulous stamper! 

Back to the challenge today.  The winner will receive a Certificate good for 40% off your entire order at Rubbernecker!  In order to qualify to win, you must post a link to your card/project here on this post by Monday, July 27.   The winner will be announced on Tuesday, July 28.     Don't forget to post a direct link to your card!

You'll find lots of inspiration to fuel your creativity on our Design Team Blogs!

Please remember to post a link to your card or project on the Rubbernecker Blog.


Wednesday, July 01, 2009

Wacky Wednesday #18 Hard & Soft Deconstructed

The fabulous Texas Grandma Bev has commissioned us to all use both metal & ribbon on our creations today, so here’s my addition! Be sure to drop by the Rubbernecker Blog to get all the challenge details and the links to the other DT members blogs for their take on the challenge today. I absolutely love how this turned out. First off, I have to tell you that the entire design and inspiration came from the June/July Stampers’ Sampler magazine with their new deconstructed stamping feature. This issue, the artist is Pam Carriker and I did use the same basic colors, the images and end result are my own though. Don’t you just love finding something inspiring, trying to duplicate the technique/look and having it evolvle? I never would have added the bold black and white triangular border to my work, but it sure frames in the images and pulls the whole project together. Pam has a great eye for detail and color that’s for sure! I am going to show you the finished project and then back up and go through step by step with the deets and photos together. I hope it makes sense and that you like the format. Here’s the finished piece. I am thinking of having it custom framed with the 7 gypsies door knob that I hung the hanger on. I will post the final project if I decide on a mat and frame etc………

P6300009

The image base is stamped on Prism Simply Smooth Vanilla. The red is Prism Cranberry Dark and the Green is Sage Dark. I mounted the Prism layers on a piece of Graphix chipboard. The finished size of the stamped layer is 4 1/4" x 5 1/2" & the finished size mounted on the chipboard is 4 3/4" x 6"

P6280002

Stipple Adirondack pigment inks on Prism simply smooth vanilla cardstock. I used Butterscotch, Terra Cotta & Bottle. Spritz with a Ranger mini mister filled with water, let dry or heat to dry with a craft iron.

Stamp images randomly on dry stippled layer. I prefer to stamp using Versafine ink as it is a fast drying pigment ink that resists water. I used Vintage Sepia for this step. The stamps include How do I love thee script RN 246-13 & Solid Diamond 1546-SO

P6280003

P6290004Cut a window out of a sheet of scrap paper if your image is larger than you want to stamp. Mask the area, ink the image and stamp through the mask. I used a Stamp-a-ma-jig to position my image. The image is Time Collage 1611-SO and inked the image with Versafine Smokey Grey.

P6290005

Punch a 1 /14” square out of a piece of scrap cardstock for a pattern. Trace diamonds onto edge of layer with pencil. I didn’t worry about them being the same size or even at all. I think with the random coloring the size variations add to the overall project.

P6290006

Free hand in stripes on diamonds using a Copic Black marker and Inkssentials white gel pen.

As a final note, the Life is a Journey, Dream & There is no painful effort text is from Scratches & stains. The eye with script above the brass bookplate os 260-1 RN They were inked/stamped in Versafine Onyx Black

P6300010

Here’s a close up of some of the detail. The tag is from a Tim Holtz Journal ticket that I made into a tag to suit my needs. I sponged the edges of my project and layers using Distress Tea Dye ink. Oh, the grommet on my tag would have covered my stamped words if I had it all the way on the tag, so I just punched the edge of the tag using a 3/8”circle punch and attached the grommet over the edge. The spinners are Tim Holtz, Lock/Key/Chain Hobby Lobby jewelry dept. and the book plate and fibers are vintage. The hanger is an unknown source and the brass knob is by 7gypsies. Have a wonderful Wednesday!!!!!!!!!!!

Saturday, October 11, 2008

Fragmented Art

Fragmented Art_SaK 002

I started with an 8" x 8" artists canvas panel and inspiration from Claudine Hellmuth. These are flat canvases, not ones stretched on frames. It was covered with K &co. DP in a neutral vintage ephemera print. The canvas was then coated with Liquitex Gel medium and dried. Petroleum jelly was smeared on to selected areas of the canvas and then the entire piece was painted with black acrylic paint and left to dry. The paint does not adhere where the vaseline was applied. It was wiped off and then swiped with a baby wipe to remove the oilyness. The background words were stamped in Versamagic chalk ink/Niagara Mist. The fragments were created by applying alcohol inks to the backs. I believe I used Butterscotch, Lettuce and Terra Cotta. I stamped the pear collage and swirls on Designer Artists paper from a Somerset Studio magazine using Stazon Jet Black ink. The fragments were glued to the DP with a small amount of Glassy Accents and cut out. The hinges are Karen Foster, little key and keyhole are Spare Parts Brads and the large key is a vintage one from my hubby's grandfathers estate. The corners are from a local stitchery/stamp/beading store in the charm section. I love how this turned out. It is hard to capture in a photo, but it is really neat IRL. My hubby has asked if he can have it for his office at work. I will take that as the highest compliment and part w/ it graciously I guess. Oh, the awesome images? All available from Innovative Stamp Creations artsy rubber stamp sheets.

Background Words: ATC Elements II

Pear Collage: Summer Elements II

Swirls: Art 4 Frames II

Fragmented Art_SaK 003