All content (including text, photographs, and design work) is © Shelly Kuck.
My original artwork is for personal inspiration only and may not be copied for publication or contest submission.
Enjoy your Visit!

Slideshow

Showing posts with label Tag Art. Show all posts

Wednesday, July 01, 2009

Wacky Wednesday #18 Hard & Soft Deconstructed

The fabulous Texas Grandma Bev has commissioned us to all use both metal & ribbon on our creations today, so here’s my addition! Be sure to drop by the Rubbernecker Blog to get all the challenge details and the links to the other DT members blogs for their take on the challenge today. I absolutely love how this turned out. First off, I have to tell you that the entire design and inspiration came from the June/July Stampers’ Sampler magazine with their new deconstructed stamping feature. This issue, the artist is Pam Carriker and I did use the same basic colors, the images and end result are my own though. Don’t you just love finding something inspiring, trying to duplicate the technique/look and having it evolvle? I never would have added the bold black and white triangular border to my work, but it sure frames in the images and pulls the whole project together. Pam has a great eye for detail and color that’s for sure! I am going to show you the finished project and then back up and go through step by step with the deets and photos together. I hope it makes sense and that you like the format. Here’s the finished piece. I am thinking of having it custom framed with the 7 gypsies door knob that I hung the hanger on. I will post the final project if I decide on a mat and frame etc………

P6300009

The image base is stamped on Prism Simply Smooth Vanilla. The red is Prism Cranberry Dark and the Green is Sage Dark. I mounted the Prism layers on a piece of Graphix chipboard. The finished size of the stamped layer is 4 1/4" x 5 1/2" & the finished size mounted on the chipboard is 4 3/4" x 6"

P6280002

Stipple Adirondack pigment inks on Prism simply smooth vanilla cardstock. I used Butterscotch, Terra Cotta & Bottle. Spritz with a Ranger mini mister filled with water, let dry or heat to dry with a craft iron.

Stamp images randomly on dry stippled layer. I prefer to stamp using Versafine ink as it is a fast drying pigment ink that resists water. I used Vintage Sepia for this step. The stamps include How do I love thee script RN 246-13 & Solid Diamond 1546-SO

P6280003

P6290004Cut a window out of a sheet of scrap paper if your image is larger than you want to stamp. Mask the area, ink the image and stamp through the mask. I used a Stamp-a-ma-jig to position my image. The image is Time Collage 1611-SO and inked the image with Versafine Smokey Grey.

P6290005

Punch a 1 /14” square out of a piece of scrap cardstock for a pattern. Trace diamonds onto edge of layer with pencil. I didn’t worry about them being the same size or even at all. I think with the random coloring the size variations add to the overall project.

P6290006

Free hand in stripes on diamonds using a Copic Black marker and Inkssentials white gel pen.

As a final note, the Life is a Journey, Dream & There is no painful effort text is from Scratches & stains. The eye with script above the brass bookplate os 260-1 RN They were inked/stamped in Versafine Onyx Black

P6300010

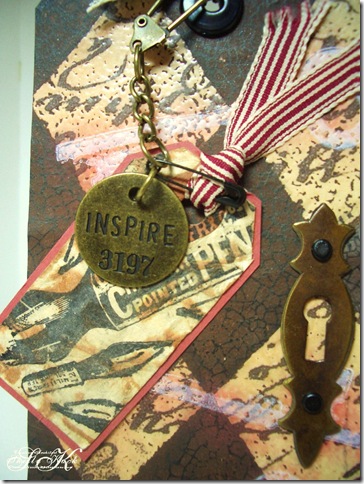
Here’s a close up of some of the detail. The tag is from a Tim Holtz Journal ticket that I made into a tag to suit my needs. I sponged the edges of my project and layers using Distress Tea Dye ink. Oh, the grommet on my tag would have covered my stamped words if I had it all the way on the tag, so I just punched the edge of the tag using a 3/8”circle punch and attached the grommet over the edge. The spinners are Tim Holtz, Lock/Key/Chain Hobby Lobby jewelry dept. and the book plate and fibers are vintage. The hanger is an unknown source and the brass knob is by 7gypsies. Have a wonderful Wednesday!!!!!!!!!!!

Wednesday, June 24, 2009

Wacky Wednesday #17 Tags!

I am hosting the Wacky Wednesday challenge over at the Rubbernecker Blog and the challenge is Tags!  Incorporate a tag on your card.  It can be a small sentiment tag, the focal point, several tags.....  Paper, metal, formica chip or fragment.  It just needs to be a tag of some sort.   Sound fun?  We would love to see your creations, so be sure to link your card/project to the Rubbernecker Blog for a chance to win a 40% Off Certificate for your entire order at Rubbernecker.

P6230009

My card today features one of the sets to be released by Rubbernecker tomorrow!  I used 3 of the stamps in the set and I can tell this will be a favorite go to set for me.  Be sure to stop by the Rubbernecker Blog for another blog stroll tomorrow/Thursday to see the sets and the samples the DT has come up with. 

Stamps:  468 Flower Silhouettes

Ink:  Distress Faded Jeans, Tea Dye, Walnut Stain, Black Soot

Paper:  Prism Suede Brown Dark, Tawny Light, 7gypsies 6x6 Paper Pad/nottinghill, Shipping Tag, Mulberry Paper, Mesh Fiber paper/Magenta

Sewing Machine

I hope you have a wonderful Wednesday!

Wednesday, June 10, 2009

Kind, Caring, Dad…………

P6080001

It’s Wednesday and that means it’s another Wacky Wednesday challenge day.  This week, Joan is challenging us to make a Fathers Day card.  I chose to add a shipping tag to my card using 7gypsies 6x6 gypsy market papers on the top portion with flourishes stamped on the bottom portion.  The man is stamped on acetate and layered over the top.  Actually, the stamp is by KK Originals and is titled Isabelle.  So, I am guessing it is supposed to be a female but I thought it looked like a guy.  The Kind and Caring definitions are cardstock stickers by Pebbles Inc.  I added a spiral clip and a hinge clip by Tim Holtz.  The alpha brads are from an unknown source.  The flourishes stamped on the card base were stamped with Distress Black Soot ink and misted with water to soften them into the cardstock and the wet edges were sponged in black as well.  The tag is raised on foam dimensional tape.   

Stamps:  Flourish Set 463, Isabelle 6607-M KK originals

Paper:  Prism Blush Red Dk, Black.  Medium shipping Tag, 7gypsies 6x6 gypsy market

Ink:  Stazon Jet Black, Distress Black Soot & Fired Brick

Accessories:  Tim Holtz hinge clip, spiral clip, alpha brads, CS definition stickers, Acetate, Hemp, Fibers.  Foam dimensional tape.

All of the challenge details are on the Rubbernecker Stamp Company BLOG  We hope you will join the Design Team in the challenge and play along!

Check out the Sale going on at Rubbernecker too!

TSUKINEKO PRODUCTS ON SALE

3 days only June 9th - June 11th begins immediately

tsukineko graphicVR.jpg 10% Off all Tsukineko products when you order online at www.rubbernecker.com Tuesday, June 9th thru Thursday, June 11th. We hope you can take advantage of the great savings on our #1 Ink Company, Tsukineko!Inks for every application ..... StazOn, Brilliance, Encore, Opalite, VersaMagic, VersaFine, VersaMark, VersaColor, Kaleidacolor, Memento and more. Tsukineko has it all!

Thursday, April 09, 2009

Rubbernecker Blog Stroll

RNDT4-7S_SAK 005

The Stroll starts at the Rubbernecker Stamps Blog where you will find the rules on how to win one of the sets being revealed or even possibly the GRAND PRIZE. If you haven’t started at the Rubbernecker Stamps Blog, you should go there now in order to not miss anything. To win the Flower Silhouettes set revealed on my blog today, you must leave a comment ON THIS POST. A random number will be drawn on Friday, 12:00 Noon.

Here is my phrase clue for the GRAND PRIZE: STAMPS

The Blog Stroll continues at Sherry’s Blog

My card today starts with the newly released Flower Silhouettes set and the Flourish and screen backgrounds that were released last week.  I love how the flourish background goes with the new stamp set!  The technique is Faux Bleach using White Simply Smooth Prism cardstock.  The background was stamped in Distress Embossing Ink and embossed with clear powder.  Next comes the Alcohol inks from the new Country side collection.  The colors in the set include Shell Pink, Willow and Cloudy Blue.  To reveal the embossed image, place a sheet of copy paper over the top of the layer and iron off the embossing powder.  (you will see it melt into the copy paper)  The flourish from Flower Silhouettes was stamped in the corners using Distress Walnut Stain.  The layer was sewn on to Prism Baby Pink Medium and then Spring Willow Medium.  The layers of ribbon sewn on the faux bleach layer are both May Arts – 1” lt. blue woven edge satin & 5/8” variegated organdy.  My little tags measure 1” x 2” and were inked up with the rock n roll technique and the screen background was stamped over the top.  The words are all one long stamp.  I sewed the tags onto a layer of Prism Baby Blue Medium, trimmed and then layered on the Baby Pink Medium.  I accordian folded the tag and mounted it on foam dimensional tape for a little dimension.  The center tag sports more May Arts ribbon including a variegated green fiber and 1/2” Blue/Brown dotted organdy.  Lastly, the beautiful buttons are SEI from the Poppy collection.  The pink ones were smooshed into my Distress Worn Lipstick pad and air dried.  I sanded the edges of some of the buttons for a worn look.  They are sewn to the card using Linen Thread. 


Here’s a run down of the supplies:

Prism Paper:  White Simply Smooth, Baby Pink Med., Baby Blue Med, Spring Willow

Stamps:  Flower Silhouettes, Flourish & Screen Backgrounds

Distress Ink:  Walnut Stain, Antique Linen, Shabby Shutters, Worn Lipstick

Alcohol Inks:  Country Side

Miscellaneous:  Clear Embossing Powder, SEI Buttons, Linen Thread, May Arts Ribbons (Rubbernecker is now carrying May Arts Ribbon by the roll.  It will be available by the yard April 21) SEI Buttons, Foam Dimensional Tape

Wednesday, April 08, 2009

Wacky Wednesday Color Challenge

I have 2 color challenge cards today using new images available tomorrow 4/9/2009. RUBBERNECKER WILL BE RELEASING THEIR FIRST NEW SETS (excluding Kittie Kits) IN TEN YEARS! Mr. Rubbernecker has been working very hard drawing and developing his computer skills to produce these sets! You don't want to miss tomorrow. In conjunction with the release, we will be having a Blog Stroll where you will have a chance to win 1 of 6 sets revealed tomorrow, or even possibly all 6 sets (THE GRAND PRIZE). You'll want to begin your stroll on the Rubbernecker Blog tomorrow morning to make sure you catch all the clues!
Today the Design Team will be posting previews of the new sets for the challenge. Be sure to visit their blogs to see what you can expect more of tomorrow. 

Today we will be giving away one 40% Off Certificate on your your entire order at Rubbernecker. In order to qualify to win, you must post a link to your card/project on the Rubbernecker Blog using Mr. Linky by Monday, April 13. Winners will be announced on Tuesday, April 14. Have fun creating!

RNDT4-7S_SAK 004   Now for my projects.  Linda Duke chose Pink & Lavender for our challenge today.  Well, I started out making a soft pastel spring card and ended up here – my usual distressed/grunge look.  I had to make a 2nd project to sorta redeem myself.  Here’s the components of this card first:

Paper: Prism Rose Light & Wizard Light.  tim Holtz Distressibles Antique Ledger Paper

Stamps:  Flower Silhouettes Set

Ink:  Distress Walnut Stain

Distress Reinkers mixed w/ water and misted on ledger paper.  (Dusty Concord, Tattered Rose, Worn Lipstick, Antique Linen)

Embellishments:  May Arts Chocolate Ribbon, 7gypsies Chelsea Collection/lavender ribbon.  Prima Flowers, Pearlized Brad.


RNDT4-7S_SAK 002 My 2nd project and much more pastel and spring feeling is a  4 3/4” x 2 3/8” shipping tag.  It reminds me of a soft and sweet Easter Dress.  I started by covering the tag front with a Pearl Adirondack Paint Dabber.  When dry it was layered with vellum, sewn and trimmed around the edges.  The Floral pattern was created using watercolor crayons to color on the rubber, misting with water and then stamping on the vellum.  Next, I sewed the grid and reinforced hole strip on.  The edges were sponged, attached the ribbons, added the brad and the torn vellum strip with the rub on sentiment.   Here’s the supply list:RNDT4-7S_SAK 001

Paper: Shipping Tag, Hero Arts Linen Weave Vellum, Worldwide Spring Garden Vellum

Ink:  Distress Dusty Concord, Watercolor Crayons

Accessroies:  May Arts Ribbons, Pearl Brad, Magenta Peach Grid, K&Co. Rub On

Stay tuned for all the fun tomorrow and be sure to visit the Design Team to see their fabulous creations as well!

                                                                           You can click on the small photo for a closer view of the details.

Wednesday, April 01, 2009

Cherish Today

Sherry's Rubber Pile Here’s Bad Sherry peeking around a pile of new rubber at our Texas gathering.  Rubbernecker Stamp Co. is releasing 7 new backgrounds today!  Stampy Backgrounds is also the Wacky Wednesday #5 challenge today.  Run on over to the blog for all the deets.

My tag features 3 of the new background stamps – French Script, Flourish & Wildflower.  The flourish was embossed in clear on a large shipping tag.  3 mini misters of pearlized distress mix were then spritzed on the tag.  Combinations include:  Fired Brick Reinker/Blush Perfect Pearls, Mustard Seed/Perfect Gold & Broken China/Pearl.  I started with Mustard Seed because it was my lightest shade and spritzed the entire tag.  Broken China was then sprayed on the top and right hand side of the tag.  Because the mustard was still wet, the mixture combines to make a pretty green in areas.  Then, Fired Brick was added to the bottom left portion of the tag.  To remove the ink and reveal the tag base under the embossed flourish background, place a sheet of copy paper over the tag and iron using a cotton setting with no steam.  You will see the embossing powder melt into the copy paper indicating that the embossing has been removed.WWBackgrounds_SaK 001

The Wildflower background was stamped over the top of the ironed tag using Adirondack Pitch Black ink.  I stamped the butterfly trail by using a black marker on a portion of the flourish background stamp.  The butterfly was die cut with Prism Black using Making Memories Slice, stamped with the French Script Background inked with Adirondack Snow Cap ink.  The die cut was finished with a spritzing of the Mustard Seed/Gold pearlized distress mist, sponged with Snow Cap and brads for the body.  The butterfly is mounted on foam mounting tape.  Did you notice the gorgeous ribbon?  Rubbernecker is now carrying Prism and May Arts Ribbon and 7 Gypsies paper and various other items from  7 Gypsies.   I used the gingham on the top of the tag and also as a mat under my dymo label sentiment.  The dymo letters were swiped with Stazon Timber Brown to antique them a little.  The bottom is finished with black eyelet holes and glass leaf charms.  I also sponged the edges of the tag with Adirondack Pitch Black. 

Wednesday, December 10, 2008

Blogger Challenge #13

RBC13 Snowflake Gift Card Holder_SaK 001

Today's Rubbernecker Blogger challenge is to make a card in any shape

other than the standard 4.25x5.5.  It can be a long or tall card, or any other shape you want it to be.  Your card

must also include snowflakes!  To participate, all you have to do is upload your card to either your blog and/or

online gallery and comment on this post, including the link to your card.

RBC13 Snowflake Gift Card Holder_SaK 002

The gift card holder started with a large shipping tag measuring 6 1/4" x 3 1/8"  I used blending foam &

the applicator tool to sponge it with Distress Weathered Wood ink.  Snowflakes were stamped in

Distress  Broken /china ink.  The snowflake background was inked in versamark and embossed in clear

powder.  It didn't give enough definition to the tag, so I ended up going back and stamping the background

using Adirondack paint dabber in pearl.  When dry, I scored the tag at 1 1/4", 3 3/4" & 4" starting at the top.

The tag was layered on pacific point CS and scored again matching up the score lines on the tag.  The

ribbon is tied around the top flap and the bottom flap of the holder tucks into the ribbon to hold it closed.

The embellishment is a snowflake pin I picked up at 90% off after Christmas last year.  The gift card is

held in place with Wacky Tac adhesive which is a sticky post it type adhesive.  Have a wonderful day, hope

you have time to play along!

Wednesday, November 19, 2008

RNBC10 Sparkle, Glimmer, Shine

I am hosting the Rubbernecker Blog challenge today. Be sure to stop by the blog and play along.

RNBC10Let it Snow_SaK

My card uses lots of sparkle, glimmer & shine. The snowflake background was inked using Adirondack Paint dabber/pearl on

the white layer and tag. The tag was then sprayed with pearlized distress mists in Weathered Wood and Faded Jeans with

Perfect Pearls/pearl added to the mists. The snowflake was stamped in Faded Jeans and the vertical text in Versafine Onyx Black.

The glittery frame started out by using my new electronic die cutting machine by Making Memories called Slice. (the tag was also

cut using Slice) The frame was inked with VersaMark Dazzle pad/champagne and embossed with holographic embossing powder.

A packing tape window has dazzling diamonds glitter on it. The square snowflake was stamped in Faded Jeans Distress ink on

white CS and mounted on the back. The frame was finished with a snowflake brad and rhinestone. Can't wait to see what you come

up with, play along!

Tuesday, October 21, 2008

Treasure Hunt Tuesday

Arrrr ye mateys, it's Treasure Hunt Tuesday at Rubbernecker.  If you haven't visited lately, you'll find that we are now offering your choice of one of two images for the treasure.  In order to claim your treasure, place your image choice in your cart, and then purchase only one other item. 

We are so excited to finally share with you that both Bev and Juliana will be joining the Design Team as permanent designers.  Joining the team as Guest Designers are Pam Hooten and Joan Ervin.   We feel so fortunuate to have Bev and Jules join the team and Pam and Joan spend some time with us! 

Smiley from millan.net

Our Design Team, as always, will delight you with their creations. Be sure to visit their blogs to find those designers that have blog candy today!

Bev  - Savor the Journey

Broni - Splashes of Watercolor

Candy - Candys Land

Joan - Stamping with a Passion!

Jules -  Stampin with Inky Fingers

Kittie -  Kittie Kraft

Linda -  Linda’s Works of Heart

Pam - Iris Garden

Shelly -  Stamp with Shelly

Tami - A Walk on the Mild Side

Sherry - Walkin' on the BAD Side!

Be sure to check back tomorrow for the next Blogger Challenge!

My sample today is a shipping tag. I just got the new Tim Holtz masks and this set is called Timeworks. After adhering them to the tag, distress inks were misted on the tag. I think I used Faded Jeans, Shabby Shutters & Scattered Straw. I left the masks on and added a couple of the gears masks over the top and misted again. (you can sorta make out the blue gears on the bottom right and top left. The sentiment, face and time dreamer image (under the clock hands) are stamped in Versafine Smokey Gray. The clock background was stamped in Distress Weathered Wood. The center of the clock hands has a black sewing notions snap, the eye has a page pebble and the clock face has hands from Spellbinders Timeless Heritage die. The hinge clip is Tim Holtz and the ball chain and fasteners are eye kandi. The fiber is Basic Grey , journey twill is unknown. All images are Rubbernecker Stamp Co. Hope you like it!

THTimeworks_SaK

Thursday, October 16, 2008

Time Reflections

ISCC16Time Reflections_SaK 

Innovative Stamp Creations Blog challenge today is tags & to use a Tim Holtz technique.  I chose to use Tim's July Tutorial

which is faux bleaching.  The distress reinkers I used are:  Walnut Stain, Fired Brick, Spiced Marmalade, Faded Jeans & Shabby Shutter.

All images are from a newly released stamp sheet from Innovative Stamp Creations called Mini Book Series: Photo Negative.  I also used a

vintage key, unknown key hole and Tim Holtz Spinners and gears.  The fibers are Basic Grey and the striped ribbon May Arts.

----------------------
Tags are fun and easy to alter!
Here's a quick-easy challenge....
Use at least 1 tag on a card, make a box, make whatsoever you desire, but you must use at least 1 technique on your tag by Tim Holtz.
Visit his blog to choose from a variety of tech's... be sure to scroll under catagories column!
Looking for Tags to alert? ISC has a package of 10, #8 manilla Tags for $1.50
There's more... win for FREE -1 pkg of Tags/Mona Lisa Stamp Sheet!
Easy, creating your own Tag with 1 TH tech and must use ISC stamps only!
Then post your link in the comments section by Sunday 10/26.  Be sure to use the key words ISCC16 so we can find your project.

Tuesday, October 14, 2008

Blog Candy & Treasure Hunt Tuesday

Behold-Belle_SaK 002

Arrrr ye mateys, it's Treasure Hunt Tuesday at Rubbernecker. As always, you can find the clue on our home page. If you haven't visited lately, you'll find that we are now offering your choice of the two images offered up for the treasure. In order to claim your treasure, place your choice of the two images in your cart, and then purchase only one other item.

I am offering Blog Candy today. You could win $10 in Rubbernecker Bucks to spend on your order. Be sure to leave me a comment on this post to be entered in the random drawing. Tami also has blog candy today.

Our Design Team, as always, will delight you with their creations.

Bev - Savor the Journey

Broni - Splashes of Watercolor

Candy - Candys Land

Jules - Stampin with Inky Fingers

Kittie - Kittie Kraft

Linda - Linda’s Works of Heart

Tami - A Walk on the Mild Side Blog Candy

Sherry - Walkin' on the BAD Side!

Behold-Belle_SaK 001

I pulled out some of my all time favorite stamps from Rubbernecker found in the Stamp Oasis Section. I used Ancient Heart and Triangle Angel. The angel was embossed with Distress Vintage Photo EP, cut into a tag and misted with distress reinkers and then sponged with a little Tattered Rose ink. She is layered on a Spellbinders Classic Scallop Rectangle die cut in coral CS. The Ancient Heart is stamped a few times on blush CS and torn, I didn't want the heart shape, just the words. The words are all from an old dictionary page.

Be sure to check back tomorrow for the next Blogger Challenge!

Tuesday, September 30, 2008

Treasure Hunt Tuesday

Be Yourself 004

Arrrr ye mateys, it's Treasure Hunt Tuesday at Rubbernecker. As always, you can find the clue on our home page. If you haven't visited lately, you'll find that we are now offering your choice of the two images offered up for the treasure. In order to claim your treasure, place your choice of the two images in your cart, and then purchase only one other item.

Our Design Team, as always, will delight you with their creations. Be sure to visit their blogs.

Broni - Splashes of Watercolor (Blog Candy) Linda - Linda’s Works of Heart (Blog Candy)

Candy - Candys Land Bev - Savor the Journey Jules - Stampin with Inky Fingers Tami -

A Walk on the Mild Side Sherry - Walkin' on the BAD Side!

The fern background was stamped in versamark and embossed in clear EP on Vanilla CS. Then, I made an alcohol ink background over the top of the embossing using Latte, Meadow & Lettuce.

Be Yourself 001

With the craft iron set on High/Cotton, iron the embossed image between a sheets of plain white copy paper. I actually use my craft mat for the under layer as it is heat resistant. The embossing will melt and absorb into the copy paper. The result is a faux bleaching with a multi colored background. Cool Huh? Thanks to Bad Sherry for playing around with this while we were demoing in Chicago recently. Love it!

Be Yourself 002 Be Yourself 003 Here's what the iron looks like when collapsed. The handle pops off and slides over the metal base. When compacted, it measures 7 1/2" long and 1 5/8" thick. It also has a steam attachment and comes w/ a carry bag. Mr. Rubbernecker/Dave would love to add one to your Treasure Hunt order today. This is not only the perfect craft iron, but travel iron as well.

Be Yourself 005

Back to the card details. The tags are both Spellbinders dies, the tan one is from the tags trio set. The Green one is from the double ended tags set and I simply folded the top of the tag over the ribbon and secured it with a glue dot. Both tags were die cut and then run through to emboss them. Follow your Heart was computer generated. The main sentiment was stamped in stazon black on CS weight vellum. The back was DTP'd with Distress ink/Peeled Paint. The leafy silhouette stamp was inked in Blanco Opaque White and stamped on the distress ink. Layering the colored vellum on the artichoke CS made the white images pop through. The black was sponged on with Blending Foam and the alcohol ink applicator handle. The strip under the tags & sentiment was stamped w/ the same silhouette stamp in 3 colors of VersaMagic chalk inks on Kraft CS. I used Sage, Hint of Pesto 7 Sahara Sand. It is layered on Caramel CS with torn edges that were sponged with Distress Walnut Stain. Stamps, inks, spellbinders, embossing powder and craft iron available from Rubbernecker Stamp Co.

Be sure to check back tomorrow for the next Blogger Challenge.

Tuesday, September 16, 2008

Festive Tag

Today is Treasure Hunt Tuesday at Rubbernecker and that means free stamps and Blog Candy. All the details are on the

Rubbernecker Blog.  Juliana & Candy are offering $10 in Rubbernecker Bucks Blog candy today, make sure to visit them for a chance to win.

While ye are sailing around today, make sure ye stop and visit the rest of me mates, Sherry, Kittie, Broni, Linda & Tami.

Fall Harvest Tag-SaK 002 

I love the dimension of the CS vellum leaves and the depth from the acrylic stamped layer with the distress mists and pigment stamping.  After die cutting and embossing the Spellbinders leaves, I sponged them with pigment inks before popping out of the dies.  Then, pearlized distress mists were sprayed on.  The vellum curled up like dried leaves.  After they were dry, I used a paint brush handle to manipulate the final shape of the leaves. 

Fall Harvest Tag-SaK 001

My tag was created with Pearlized Distress Mists made with Distress reinkers,perfect pearls & water. 

Pearlized Distress Mists:

Scattered Straw/Gold perfect Pearls, Dried Marigold/Pearl, Fired Brick/Red & Shabby Shutters/Bronze

Adirondack Paint Dabber

Lake Mist

Ink

Adirondack Pigment Cranberry, Bottle & Terra Cotta

Versafine Onyx Black & Vintage Sepia

Stamps

Baroque Background (stamped in lake mist paint dabber)

Leaf Set

Festive Fall

Wheat Border

Accessories

Jumbo Shipping Tag

Cardstock Vellum

Tim Holtz Muse Token

Ribbon & Fibers

Spellbinders Assorted Leaves

Inkssentials Mini Misters


Wednesday, August 06, 2008

Why Tags? & a Blog Candy Winner!!!

RNDT spooky greetins_SaK 002

First for the winner of the $10 Rubbernecker Bucks. Random.org chose #17

Random Integer Generator
Here are your random numbers:17

Timestamp: 2008-08-06 13:38:51 UTC

Congratulations Sarah Hemphill - blog Vintage Figments

Sarah said...
I have really enjoyed watching your talent evolve over the last few years. This card is awesome. One of my favorite techniques is enameling...need to play with it more often.

Thanks for the nice compliment Sarah, email me to claim your Rubber bucks!
I have been asked why I make tags. There are several reasons for this #1 being I love making tags! Tags are the perfect little canvases to create your art on. Shipping tags have a coating on them making them easier to work with especially when saturating with distress inks. Tags are the perfect way to showcase a variety of images and techniques for the stamp companies I represent to show off their images at stamp conventions. Secondly, I am asked how to incorporate the tags in papercrafting. Tags make artistic bookmarks, make an impact when added to a card front and add interest to scrapbook pages. You can also put tags in a binder to have a technique book for reference. You can make a tag book by tying the tags together with ribbons or fibers or use a binder ring. You can find many examples of tag art by clicking on Tag Art on the left side of my tool bar. Have fun with them, you will be hooked too!

RNDT spooky greetins_SaK 001

I used an acrylic resist for this example. The moon was made by punching a scrap of blank rubber with a circle punch and mounting on easy mount. To create the resist, ink the images you want to resist with acrylic paint daubers (white here) and stamp on the tag. Let dry and then spritz the tag with a mixture of Distress ink/water/perfect pearls. I used Walnut Stain/Gold, Fired Brick/Bronze & Dried Marigold/Copper here. Let dry and iron the tag. (this can also speed up the drying process) Stamp the remaining images using black ink over the top, sponge edges and you are done. Images and inks are all available from

Rubbernecker Stamp Co.

ON SALE NOW

*** NEW***Ranger Adirondack Pigment Pads & Reinkers on Sale***NEW***

5 days only

Sale extended thru Monday August 11th

Adirondack Pigment Pads

Adirondack Pigment reinkers

Thursday, July 17, 2008

Acrylic Resist Tutorial

As promised, here's the April tutorial that I tried from Tim Holtz's blog.

Art Unlocked_SaK 001

You will need: Craft Sheet, Designer paper, Acrylic Paint, (burnt umber used here) Shipping Tags, Clear Embossing Powder, Versamark pad, Stazon Black & White, Distress ink/Tea Dye, Adirondack Pitch Black, Craft Iron, pastel chalks, Walnut Ink, Acetate, assorted embellishments.

Start by cutting the DP the size of your largest shipping tag and stamp a large solid pattern using Versamark ink. Emboss with clear powder. Cover paper with acrylic paint and let dry.

CIMG6245

Using a damp rag, wipe the paint off the embossed images to reveal the DP.

CIMG6246

Stamp the crackle pattern over the entire layer and carefully wipe off the embossed areas.

CIMG6247

Stamp desired images on the small shipping tag using Stazon ink.

CIMG6248

Saturate using Walnut ink.

CIMG6249

Crumple the tag up while still wet and smooth back out lightly.

CIMG6252

Swipe the stamp pad across the crumpled tag to accent the peaks, then iron to flatten it and dry the tag.

CIMG6253

Stamp the keys and sentiment using Stazon inks and highlight the keys with chalks.

(I stamped the sentiment on a strip of acetate so it did not blend into the layer) The bottom key

is partially on the acetate and partially on the layer.

CIMG6255

Affix the stamped DP to the largest shipping tag, add a jumbo eyelet, Small tag, ribbons and hardware.

The key hole is vintage hardware from a recent antiquing trip. (I got 8 for $6)

I hope you enjoyed this tutorial and have found it helpful, have a great stamping day!

P.S. Beate asked me to do a tutorial on collage stamping for the Weekly Inkling over at Splitcoast, if you are interested it can be viewed HERE

Art Unlocked_SaK 002